|
A4 layout: start a new drawing . select the format
tab and check the specify format option and select
ISO-A4 . select the scale tab and set the scale
1:1 . select the drawing standard tab and from the predefined
standards drop down list select BS308 . the given BS308
standard has been superseded by BS8888 and needs some correction
. select modify
note: some network settings do not access the predefined
standards . the standard will need to be made . use modify
to set the standards and then save the standard as BS8888
select the number tab and check decimal places are set
to 2 and units to millimetres and select suppress
trailing zeros . select the text tab and set the text
height to 2 . select the terminators tab and set
type to dimension arrow and style to filled and
length to 3 and width to 1.5 . select the placement
tab and check the above level and along line orientation
are checked . and select OK
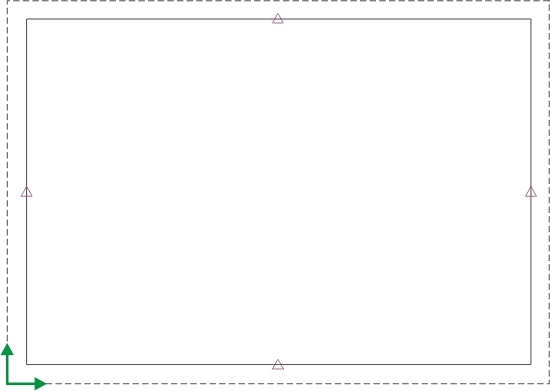
select the rectangle tool and sketch a rectangle from coordinates
10,10 to the top right corner . use toggle fix lines to
fix the left and bottom line of the rectangle . drag the top line
to X200 and fix . zoom in on the right line and set to
Y287
to access zoom use the space bar to put the drawing into manipulate
mode and the ctrl key with the mouse to zoom
and the shift key with the mouse to pan (prodesktop
8 does not have this shortcut) or use shift+Z to zoom and
shift+A to autoscale
|
|
|
|
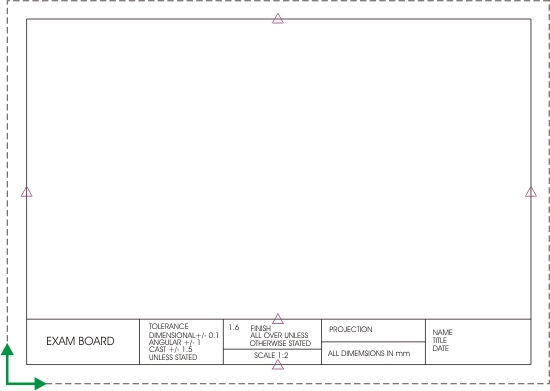
use the line tool to draw a horizontal line from 10,35
to 287,35 . and fix . use the line tool to section the title block
(do not fix these lines . they can be moved later if necessary)
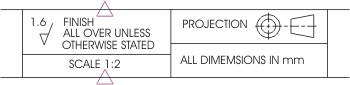
select the text note tool  and click and drag to set up a text note . double click on the
text and enter the text (use single line or multi-line as necessary)
. select the text tab and set the height
and click and drag to set up a text note . double click on the
text and enter the text (use single line or multi-line as necessary)
. select the text tab and set the height
text should be in uppercase (apart from the unit in ALL DIMENSIONS
IN mm) . text is set to 2mm and thin on an A4 layout . the exception
is the EXAM BOARD . set this to 3.5mm and thick
drag the text into position using the select annotations tool
 and delete the leaders
|
|
|
|
right click on drawing in the drawings browser and
select new sketch . zoom in on the title block and use
the drawing tool to draw the finish and the orthographic
symbols . the centre lines for the orthographic symbol are made
from drawing a series of lines . save the drawing layout as A4layout
|
|
|
|
there are two ways of using the orthographic layout . open the
layout and save copy as to make a copy . open the copy
and use it for the orthographic drawing or...
in the new drawing dialogue box select use exisiting format
and select browse and open the layout . using existing format
has some constraints . it is not possible to save a drawing that
uses existing format across drives . and lines and text on the
layout cannot be edited
printing: the line thickness for printing A4 needs to be
editied . select tools / options and make the standard
line width 0.2mm . select file / print setup and select
landscape and OK . select file / print and select
the print truscale option and cancel (selecting
OK will print . selecting cancel will save the setting without
printing) and select file / print preview and check the
drawing
note: a deskjet printer will not print the border
line on Y287 . it will need to be moved to Y285 to fit the print
. printing from print preview can be tricky . close print preview
and print from the print command . prodesktop will revert to the
default print contents of window if changes are made prior
to printing
|
|
A3 layout: the border needs to be drawn from 10,10 with
the right hand edge at Y410 and the top edge at X287
|
| |
